Harvest Intelligence
Getting Started with Spotlight
A quick guide to getting up and running + Troubleshooting
You have your first Spotlight in hand, and would like to get it configured, and pointing the right mushrooms?
Spotlight is easy to use for pickers and for managers once it's set up, but as a powerful tool that is designed to allow you to make many decisions about your harvesting process, it takes a few steps to set up correctly. It's very important that you get each step right, in order to lay the foundations for a nice, smooth experience as a harvesting aid in your farm.
Most farms request an on-site, in person training from our team of experts. There are many intricacies, and nothing can replace experiencing the use of a Spotlight while assisted by an expert. However, we're keen to make it as smooth as possible for you to get started, and so here we rovide a few resources for you to work with, on your own.
You can download the latest version of the full Spotlight Technical Manual here. It is extensive, and may seem complex. Most people do not need to know everything about the advanced parameters featured in it.
Below is both a useful starting point and a quick reference to the basics, to get you started.
1. Planning Storage for Spotlights and Charging Docks


Storing your Spotlights, while keeping them accessible for daily deployment, is important to plan properly with an efficient process in taking out and putting back the Spotlights at the end of each shift.
Some farms choose to make the managers responsibe for handing out the Spotlights, or even placing them on the trolleys / lorries, while other farms make the Spotlights available for the pickers to collect themselves, from a convenient central location.
Here are a few examples:
1. A cart with wheels, on to which you place the Spotlights as well as the charging docks, connected to a power bar that can easily be plugged into your hallway power plugs. This is a great idea for large farms where the Spotlights and batteries should be brought near the room(s) that are currently being harvested. In such a case, often the managers are responsible for installing the Spotlights on the lorries on a daily basis, and retrieving them at the end of harvest.
2. A self-serve model is adopted by some farms, each Spotlight and pair of batteries being marked with the picker's name. The location of the battery charging stations must be easily accessible to pickers so they can swap their battery at lunchtime.

2. Connect the Spotlight to your farm Wifi
.jpeg)
.jpeg)
** If you've already set up your Spotlights on Wifi but are facing issues, go to the Troubleshooting section **
You need to do this only once, for each of your Spotlights. If your farm has several different Wifi networks that you want the Spotlights to connect to, you need to do this again, for each network, within the range of that network.
Insert the battery into the unit, and wait for it to boot. It's ready within less than 1 minute, and after displaying the MycoSense logo (two of them in fact), you should see the projectors project one vertical line on the left side of the image, and one on the right side. The lines may be green (low power mode) or color (demo or normal mode).
The LED lights on the side of the Spotlight should be all one color. They may be white (no Picking Instruction selected) or any other color (the color chosen for the active Picking Instruction. More on this later).
To load your Wifi credentials into the Spotlight:
1. Equipped with your Wifi name (SSID) and wifi password, generate a standard Wifi QR code using your computer and this service: https://www.qr-code-generator.com/solutions/wifi-qr-code/
2. Print your Wifi QR code onto a sheet of white paper, so that it is large (10cm to a side)
Important note: For the next steps, you need to be with your Spotlight in a place where the Wifi network you want to connect it to, is accessible. The Spotlight needs to be able to detect the network in order to save it.
3. Long-press the right-most pushbutton on the Spotlight (it has a symbol with two arrows pointing left and right). Long-press is 2-3 seconds long. If you short-press (just a fraction of a second) it enters into another mode. Don't worry, just short-press any button twice to return to the basic mode (the mode with one solid color of LEDs on the side of the unit). The long-press should have put the Spotlight into QR code reading mode: It projects a square of light.
4. Position your Spotlight orthogonally to the page you printed the Wifi QR code on, just far enough from the page so that the projected square is the same size as the QR code (the light square should be on top of the QR code). You should be 50cm to 1m away from the page. The Spotlight should instantly read the QR and display a message such as "Connecting to... (wifi name)". It will then show "Disabling IP-v6" briefly, and go back to its normal "standby mode" (vertical line on the left and right). That's it, the Spotlight should be connected to your Wifi.
If for any reason the wifi connection didn't get detected, the perimeter of the projected light square will briefly turned RED. Just try scanning the QR code again. The most likely reasons for failure are:
- The Wifi network is not available at that location
- The Wifi name or password were incorrectly captured when you created the QR code
5. To check that the Spotlight is connected to your Wifi, and ALSO that it has connectivity to the Harvest Manager server that is hosted in the cloud, do the following: Long-press the first button on the left, then the 3rd button (orange LED above it): You will see projected a graphic showing the Wifi signal strength (like the signal bars on your mobile phone), as well as a mushroom with letters HM on it (Harvest Manager). It will show if the Spotlight is properly accessing the server.
The photos on the left show the recommended panel antenna (installed inside the growing room, survives cook-out), and access point that connect to it (via coax cables through the wall)
3. Ensure your Spotlight is properly positioned, placed on a support bracket that's adapted to your type of cart/trolley
Refer to the bottom of the Examples webpage to see pictures of how Spotlights should be attached to various types of carts.
Once you have a proper bracket that offers the adjustments needed (Tilt, pan, turn, up/down) so that it can be adjusted to point the right area of the bed in front of the picker (depending on her height, and on which level she's picking), refer to the following video that shows how it should be properly positioned:
4. Selecting a pre-loaded Picking Instruction
The following video shows how a picker selects a Picking Instruction to use, at a particular time of day, depending on the density, size, and spread of the mushrooms.
5. Thinning (Separation) of clumps (clusters, groups)
This video shows how to adjust Thinning parameters, to achieve the right kind of separation on the bed
5b. Installing the Harvest Manager App on your phone
Android app for tablet/phone:

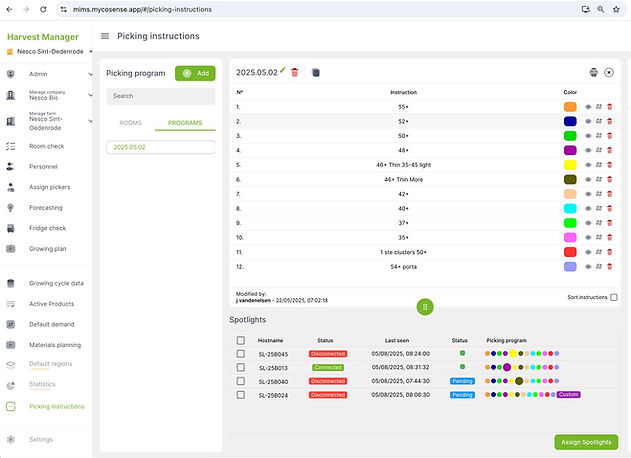
6. Sending Picking Instructions to one or more Spotlights, in the form of a Picking Program
The following video shows you how to manage Picking Instuctions and Picking Programs, and send them to one or several Spotlights in your fleet.
The simplest way to install the app on your iPhone or Android phone is described below. The QR code on the left is intended for tablets & connected devices that will be permanently installed on your farm.
7. Editing Picking Instructions
This next video teaches you how to edit Picking Instructions on the computer, and update the on your Spotlights.
8. Changing the order of Picking Instructions
Next you can learn how to change the order of Picking Instructions, within a Picking Program
9. Moving Spotlights from one Farm to another Farm
This is accessible only to managers who are responsible for multiple farms. If they wish to move Spotlights from one farm to another:
Go to the left side menu “Manage Company” (do you see this menu?) you should open it and go to the menu “Spotlight & VisionBox”, and you will see both farms’ Spotlights.
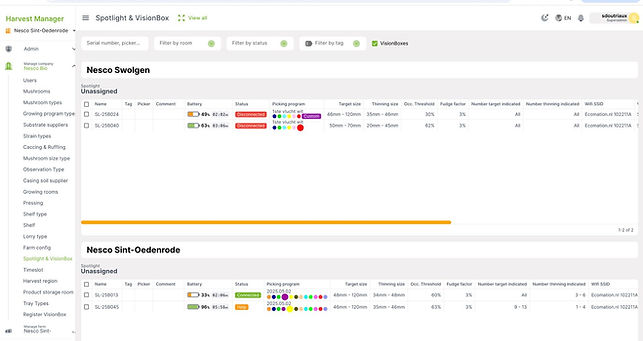
Select the Spotlights you want to move (green checkmark) and then hover over the Config button at the top. Select “change farm”


Now all four Spotlights are in one Farm. You must then connect the two Spotlights you added, to the Picking Program you’re using in this Farm:

Close the "Manage Company" menu on the left, and scroll to the bottom to "Picking Instructions". Make sure at the to-left that your current Farm (where you want to use the Spotlights) is selected.

Select your Picking Program, click the button “Assign Spotlights” at the bottom right, and select the two spotlights you moved into this farm. Click Add to Picking Program

Now all four Spotlights are linked to this Picking Program, in this Farm.
9b. Deleting Growing Cycle data from the Growing Plan
This video shows you how to delete a Growing Cycle if you’ve made a mistake when adding a Growing Cycle to the Growing Plan. In the video, the Growing Cycle we had created in Room 38, starting December 29th, was incorrect, so we want to delete it and add a new clean cycle. You will see that to delete a Growing Cycle, you have to start from the bottom, deleting each phase one by one. You can only delete a phase if its duration is 1 day, so when you click on a phase that’s longer, you have to first change the end date so that it’s one day long, then the delete button appears and you can click it. If there is data already input in the system for any of the days, you have to first delete that data (as I show you, deleting the Room Reports items that had been captured in that Growing Cycle).
This process ensures that the user understands that by deleting a Growing Cycle, she is erasing all the data she may have captured in that Growing Cycle.
9c. Importing Personnel (pickers)
Most farms will push personnel data (picker names, numbers, vacation, etc.) from their HR system, via our API. However, a manual import mechanism is available for farms that do not have an HR software that offers API data exports. The template can be downloaded here.
Date columns have to be prefixed with day and then date formatted in YYYY-MM-DD (ex. day2026-02-04), you can build as many as you want in the future.
These are available options for date cells,
1 - available
2 - sick (leave)
3 - imposed day off (leave)
4 - asked day off (leave)
5 - booked (set by system)
6 - holiday
I usually just put 1 (available) everywhere and then use the personnel page within our system to change status by selecting ranges with SHIFT + drag over cells (see picture attached) or using the "Group update" option.

With Group update you can set recurring patterns for the next N number of weeks in.
(ex. if you choose
- Group A,
- status Available,
- start date 02/02/2026 (Monday),
- number of weeks 10
- interval of days 5
and then hit apply, the system will set that all pickers in group A are available from Monday to Friday for next 10 weeks starting from 02/02/2026.
10. Tell us what more you need!
We're here to support you. Please tell us if you need any help.
The fastest ways to obtain support from the MycoSense team, for any reason at all, are:
1. Within the Harvest Manager app (on your computer or mobile), use the "Report a Bug" button (even if there is no bug! This is just an easy way to reach our support team).
2. Click the "Let's Chat!" button on this website (bottom right). We will pick up the live chat if we can, otherwise you can send us a message.
For more commercial questions it's best to use this second option. For real technical issues, the first. Don't forget to tell us who you are and provide your email address or phone number, so we can reach you.
Thank you for using Spotlight, and for helping us improve our products!
11. Troubleshooting
Wifi Issues:
"Even though we have Wi-Fi in the house, some SpotLights are still not connected. What do you think the problem could be?"
Answer:
One thing to check is to see if the “break” is at wifi level or at the connection between your internet and our server. to do this, click on the leftmost button, then on the middle button. This should, for a few seconds, show some symbols on the screen:
-
Wifi “signal” bars on the left, shows the strength of the wifi connectivity (if it’s grey, then the Spotlight hasn’t been able to connect to the local wifi).
-
On the right the mushroom symbol with “HM” on it means if the connectivity goes all the way to our server (“Harvest Manager”). If it’s green, everything should work.
If the mushroom symbol is crossed out while the connectivity bars are green (not crossed out), then it’s a problem only your IT people can fix (or a connectivity problem at your internet service provider). Your IT should be able to see the Spotlights on the network, and then determine which ports on their local wifi network are blocking the communication to the web server.
In the image above, the Spotlight isn’t able to connect to the Wifi, for some reason.
• Is it too far from the wifi antenna?
• Is the Wifi overloaded with devices and not offering it an IP address (DHCP overload)?
One thing you can do to test the second hypothesis is to scan the Wifi QR code again, with the Spotlight, and see if that reconnects it (if the Wifi router gives it a new IP address):
Once you’ve scanned the QR code with the Spotlight, you should see on the screen the message “Connecting to … Wifi” and then “Disabling IPV6”. (briefly, don’t miss them!) That signifies it went well (you do the keypress to look again at the network symbols to check).
If however after scanning the QR code the line colored square around the QR scan window turns red (very briefly) and disappears, without further messages, it signifies that the Wifi router isn’t letting the Spotlight connect.
"I scanned the Wifi QR code and that red window appears and then disappears"
-
That means that it’s a problem with your farm’s wifi. Either the Wifi isn’t available at that location (you’re too far from the antenna), or the Wifi router has run out of IP addresses to hand out (DHCP roster overload).
"I don’t understand what the problem is, because I placed the antenna inside the house , right in the middle. The Spotlights at the front are connected, but the ones at the back are not.
From the middle it’s the same , even the one next to the antenna is not connected ."
-
It sounds like your wifi router is refusing the let some of the Spotlights onto the network, perhaps because the DHCP server has run out of IP addresses to hand out. I’ve faced this at many farms, for security reasons IT limits the number of IP addresses that the DHCP can automatically hand out. So once that limit is reached, Spotlights will only be able to connect either if they previously had been assigned an ip and are allowed to reconnect, or it’s “first come first serve”: If you switch off some of the other Spotlights, the new ones are then able to connect.
